Saturday, 30 April 2016

Arduino - Display Character on 4 Digit 7 Segment Display


Hi,

Going one step further in learning Arduino UNO, I wanted to print word "HACK" on Display module with 4 Digit and 7 Segments, you can check specification here : Link

I was struggling to know how it works and which pins to connect where on Arduino board.

As its digital display we will use Digital pins from Arduino board  from 1 to 13.


This is how segments are numbered on actual Display Unit from a to g


Now how do you set-up the Circuit?
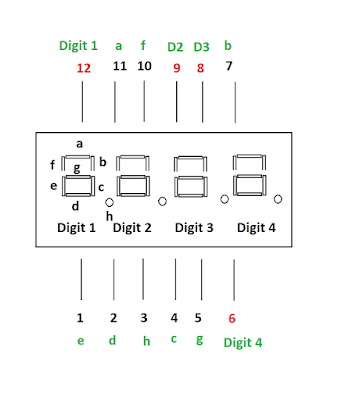


Pin structure and its functionality is as follows :


Key is Logic!....If you want to display anything on Digit 1 of display uni then you need to enable Arduino Pin 2 and set its voltage to HIGH and set other Digits to LOW

Core Program Logic 

1. Turn on first digit, turn off all other digits
2. Turn on segments we need for first digit and set delay to 5
3. Turn off all digits, turn on second digit
4. Turn on segments we need for second digit and set delay to 5
5. Turn off all digits, turn on third digit
6. Turn on segment we need for third digit and set delay to 5
7. Turn off all digits, turn on fourth digit

8. Turn on all segments we need for fourth digit and set delay to 5


Hope this helps...!


Arduino Uno Tutorial - Blinking LED


Hi,

I never worked on Arduino before so it's really interesting!..

Just to give you basic intro, we can use Arduino board for connecting multiple sensors, LED's, Display Units and program them to what we want!.

To start with, lets blink an LED !


  1. Take any sample LED light, in simple language it always has 2 "Legs" one is long and other is short -  Long Leg = Positive (+)   ,  Short Leg = Negative  (-)
  2. For this project, insert Short Leg of your LED into ground socket "GND" of your Arduino board and Long Leg into Socket No. 13
  3. Now your all set for programming your Arduino Board.
  4. You need Arduino IDE for writing a program, and its similar to C programming!
  5. Download your IDE from https://www.arduino.cc/en/Main/Software
  6. Setup() function is used for setting up environment, like declaring variables 
  7. loop() function is used for executing code continuously
void setup() {
  // initialize digital pin 13 as an output.
  pinMode(13, OUTPUT);
}

// the loop function runs over and over again forever
void loop() {
  digitalWrite(13, HIGH);   // turn the LED on (HIGH is the voltage level)
  delay(100);              // wait for a second
  digitalWrite(13, LOW);    // turn the LED off by making the voltage LOW
  delay(100);              // wait for a second
}


That's it, now its time to run your first program on Arduino UNO.


Blue LED - Short Leg connected to GND and Long Leg connected to pin 13 of Arduino


Arduino IDE - Program to Blink LED connected on pin 13


LED Started Blinking!....


Will post more on Arduino Board soon...

Tuesday, 19 April 2016

Dumping Clear Text browser passwords from Windows Memory


Hi,

We all know about Mimikatz tool being used for dumping windows credentials from memory.
What if we want to retrieve passwords from web browser or other applications from memory?
Ex. google.com, facebook.com or any other website/corporate web portals

Most of the time in corporate network, employees logs in to corporate portal with Domain passwords.
If you can dump memory from machine and analyse to it to get web passwords in clear text then this trick really helps!

Download tool called Dumpit from here

Lets imagine a scenario where victim has logged in to Gmail.com


Attacker executed Dumpit.exe with Admin rights


You can simply analyse .raw dump file with windows "find" command or "findstr" command.
and you can get all passwords in clear text!

Below screenshot you can see clear text passwords for gmail.com entered earlier in browser!


Data Exfiltration via HTTP / Web server logs


Hi ,

I was just working on project, and got an Idea of exfiltrating data via HTTP!......
This might be already know to you, but adding here for documenting purpose.

Scenario :
What is if you have access to a victim machine and quickly want to ex filtrate some very important figures/key data or may be anything.

First thing is copy all your data in this case attacker wants to exfiltrate some victim credentials.

Simply paste data after attackers domain name / IP this will generate Logs at attackers web server.
Attacker will simply open web server log file and read the ex-filtrated data i.e credentials.


Attackers opens web server logs and look for ex-filtrated data


Attacker replaces by default encoded characters and view credentials


Although its very simple trick but its works in real environment!..


Friday, 15 April 2016

Decrypting SSL traffic via tshark


Hi,

Just a thought what is we get domain access, can access any machine within network and further eavesdrop on SSL connections on multiple machines? one step ahead, send data to attacker!

tshark -n -r ssl.pcapng -o http.ssl.port:443,4430-4433 -o ssl.keylog_file:sslkeylog.log -Y ssl -V -Y "http.request" | find "pass"


  1. "ssl.pcappng" is our pcap dump file
  2. "sslkeylog.log" is our pre master secret file containing SSL keys generated by browser
  3. "-o" is used to change preferences setting for SSL protocol to get SSL keys from log file.


Hope this helps!

Decrypt SSL Traffic


Hi Consider a scenario where attacker has access to client machines and want to further intercept SSL traffic to extract may be bank username, password or anything over SSL!!!

Well first thing attacker need to enable logging of SSL keys!

How can you log SSL Keys in a log file?

By default, Crome and Firefox browser has capability to export SSL keys provided you point your browsers to the flat log file location, well how can you point your browsers to log all keys into the log file ?

For this you need to follow below steps :

  1. Create user environment  "Variable name" =  SSLKEYLOGFILE
  2. Set the "Variable value" = Path of log file where you want to save SSL logs
  3. Ex. Variable value = C:\users\admin\ssllog.log
  4. Create blank file on above specified path "c:\users\admin" with same name "ssllog.log" 
  5. That's it!....
  6. Start browsing any SSL enabled websites Ex. https://www.yahoo.com
  7. You will see that browser has started depositing SSL key data in your "ssllog.log" file
  8. Now it's matter of time before you decrypt the traffic using Wire shark
  9. Open your Wireshark instance
  10. Go to Edit > Preferences > Protocols > Select SSL and add the location of "ssllog.log" file
  11. Now your are all set to decrypt SSL traffic of websites being visited on the browser!
  12. Lets open https://yahoo.com and login with your username and password
  13. You can see that traffic has been decrypted by wireshark and we can clearly see usernames and passwords in plain text!!!!


That's it, we have successfully decrypted SSL traffic, although its older technique but still effective.